| Edtech Home | About | Classrooms | Classes | Lessons and FAQs |
Exercise - Sending your file to the web serverIn this exercise you will upload your new web page to the Life Science web server, using Fetch, a File Transfer Protocol "client". Then you will be able to view your page from any computer that is connected to the internet and has a web browser installed. In order to be viewable on the web, your page must be installed on a web server, a computer that is running software that enables it to interpret requests from web browsers like Netscape and Internet Explorer. When a browser requests your page by specifying it's URL, the web server locates the file and sends it back. The browser than interprets the HTML and displays the document on the user's computer screen. This communication between browser and server is accompished using HTTP - Hypertext Transfer Protocol. File Transfer Protocol is a format for transmitting files between two computers. It's not the same as Hypertext Transfer Protocol. In general, protocols specify how computers will indicate to each other that a message has been sent and received, whether or not data compression has been used and what type, and the method of error checking. Another protocol we use almost every day is POP, or or Post Office Protocol, and STMP, for Standard Mail Protocol when we read and send our email. One does not need to know the technicalities of how protocols work, but you should be aware that you use them, and that they differ from one another. And you need be concerned that your computers has the right "client" software installed, to communicate with the FTP server, HTTP (web) server, or email server. In this class we will use Fetch as our FTP client. Windows users might use Leech FTP or WS_FTP on their machines. Other ftp clients are available as well.
|
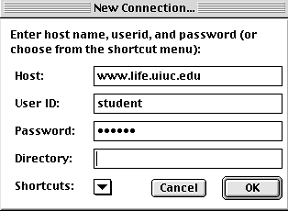
Step 3.Enter the server name, then user ID: "student" then the password given in class. |
|
Step 4.
Scroll down to the folder named "students" and double click to open it.
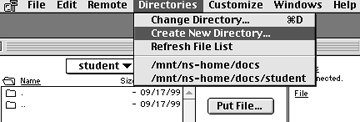
Step 5.Create a new directory and name it with your last name |
.
|
Step 6.
Locate your html document on the computer hard drive and drag it to the Fetch window and release. It will make a copy of iteself on the web server.
Note: this is a copy operation, not a move. The original remains on the hard drive.Step 7.
Open Internet Explorer and go to FILE>OPEN>LOCATION and type in the URL:
www.life.uiuc.edu/students/what_the_name_is.html/
Future edits: Now whenever you want to edit the page, you reverse the process by downloading the latest verision on the server to your hard drive, making the changes in in your text editor as we've done in class, then sending it back again as in steps 1 -7 above.
 Step 1.

